Pages

Friday, May 3, 2013

Guest Bathroom

I am so happy to say that my Guest Bathroom makeover is finally complete!  It's been about a 2 month long process trying to get the paint right, accessories and fixtures installed but now that it's officially done I feel like it was well worth it!

Here is our bathroom BEFORE:
Nothing too exciting - definitely needed some love.
 
I knew I wanted to to paint the walls grey but worried that it would become a cave.  We had done wainscoting in another bathroom but it was ginormous pain in the booty so we decided we didn't really want to do that.  I did some pinteresting and decided to split the wall with a chair rail and do white on the bottom and grey on the top.  Voila!
 
I got the idea to frame the mirror here and I love it!  It adds such a custom look without costing hardly anything!
 
I wasn't planning on putting anything on this wall until I saw these little buttons.  I thought they were so cute and just added a fun texture and visual interest
 
Our thought with this candle plate is that when guests come we will display travel supplies on it in case someone forgot something but when no one is here it will just be blank.
 
 Storage under the sink - extra soap, hair care, toothpaste, etc.
 
Hope you've enjoyed the tour of my Guest Bathroom makeover!
 
Happy Weekend!!
 
Linking up to:
 

Monday, April 15, 2013

Organization: Handbags

I have been trying to figure out a good solution for my handbags since before I even did my Master Closet Redo.  It seemed like they were always in the way, never looked neat or organized no matter what I did and it drove me bananas! 
 
They started out being stored in a laundry basket at the top of the closet...classy I know.  As of a few days ago they looked like this....
It's definitely not terrible but it wasn't quite right either.  I wanted them to be more accessible because as it were if I tried to pull one down, they pretty much all came down with it.  Booo.  Last weekend I was at the glorious of all glorious stores - The Container Store and found these bad boys...
Yup - that'll do it.  So I bought a whole bunch and got to getting them set up right away.  Before buying you will have to make sure that the shelf you are going to attach them to is going to work with them but if they do they are great!
And the final product...


So much better! I can see everything and I only need to pull out one at a time!!
 
Other handbag storage I like:


Saturday, April 13, 2013

A Feature on Sheknows.com

Something so exciting happened!  A few weeks ago I was contacted by Jana Randall, a write for the Home and Living section on Sheknows.com.  She wanted to feature my linen closet makeover in a project she was working on about tidy closets.  So of course I said YES - please do!

A couple days ago I got the word that it was out there and ready for viewing.  So here it is - go check it out!


Also check out all of the great tips and tricks on sheknows.com.  It's a great website full of awesome ideas and knowledge about anything from health to shopping, beauty, etc. 

I hope you enjoy!!

Thursday, March 7, 2013

The Loft: Organization

One of my top priorities these days in anything I am doing to improve my home is organization and storage.  We have plenty of space in this house for the two of us but finding places to store things can sometimes be a challenge.  As far as organization...it just makes me happy.
 
Our new Ikea desk has a top drawer to the right and was pretty much a hot mess after we put everything back in.  So obviously I was on the hunt for some reasonably priced but stylish organizational tools and finally came across the Martha Stewart stack and fit collection at Staples.  They are perfect because you can customize them to fit your needs (by the way, although it may seem like it - I actually am not a spokesperson for Martha.  Her stuff just always works me.  All opinions on this blog are mine and I have not been asked to review every product she has ever came out with...maybe someday.  Ha ha ha). 

The desk itself came with an insert that rests on the top of the drawer where we store our pens, pencils, scissors, etc which is nice because we don't have to have them sitting on the desk.
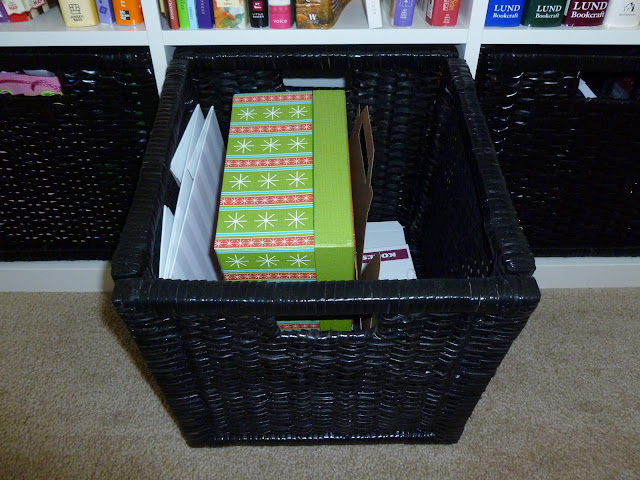
Now, moving on to the Expedit. We purchased baskets to fit on the bottom row because we knew we wanted to use the top for books.  It took me a while to decide what to put in the baskets but one day it finally hit me!  I needed somewhere to store all of our gift wrapping supplies!  I had been seeing all of these amazing ideas on Pinterest for storing those items in big elaborate over the door hanging devices but we just didn't have that kind of room so this worked out great!
 The first basket holds all of the extra gift bags and tissue paper
 The second basket is for gift boxes
 The third basket is for gift tags, ribbon, and gift card boxes
 The final basket is a little random but this is where we are storing our extra extension cords and timers for our lights.
 Hope you've enjoyed my little organizational tour and come back for more tutorials from The Loft!


Tuesday, March 5, 2013

The Loft

So, we have a loft in our home.  When we first came in and looked at this house before we decided to move in I thought the loft was soooo cool.  I just liked how it was open and there were lots of windows around so it was bright...however I quickly discovered what a freaking eye sore it could be!  Blahhhhh.  Enter exhibit A.
There it was, in all it's glory right when you walked up the stairs.  NOT CUTE!  So we left it this way for a good 5 years until finally it could be stood for no longer.  I got the itch...you know the one where your like "ok we aren't moving any time soon and I am so sick of looking at this and since we aren't moving any time soon I should probably like what I am looking at every day so I'm finally going to quit complaining about it and do something about it, itch."
 
Here are the steps I went through:
 
#1.  First things first - get rid of the junk!  Whether that means actually getting rid of it or donating or just putting it in storage for now, get the stuff out of the room that is not neccessary, not being used, shouldn't be in there in first place etc.
 
#2. Next, I wanted to decide on a color scheme.  I had been toying around with the idea of going with a black and white/neutral color scheme throughout the house but knew I wanted some accent colors to go along with it.  Since I redid the linen closet with the teal color I definitely wanted to incorporate that and I also just really liked the idea of adding a bright yellow so that part was decided on.
 
#3. I needed more seating in the loft desperately so we set off to Ikea and went with the Expedit shelf and decided we would turn it on it's side to make a big bench but still be able to use it for storage. 
 
We also picked up a white desk, chair and a two tiered Expedit Shelf for more storage. 
 
#4. Accents and Decorations.  I don't like to set out to find specific things at specific stores because that never ever works out so although it makes for a long process over the next few months as I was out and about I would just find things or ideas that would work perfectly in the loft and I would pick them up as I found them.  The room came together so smoothly this way.  Stress free and easy - just the way I like it! 
 
So without further ado...here is the unveiling of the loft.
 

   I love it! I think it will be a constant work in progress but I am so happy with how it is coming along.  The canvas above the desk is a picture we took when we were in Hawaii 2 summers ago and we have decided to make a collage of canvas' from other trips we have taken so we will hopefully constantly be updating that. 
 
Come back over the next few days/weeks for some tutorials on projects around this room and let me know what you think!
 
Also, just as a side note we also have this ledge on the landing in our stairwell that we updated as well as part of the loft redo...
 
Before:
 
After:


Monday, September 3, 2012

Tutorial: Bench Cushion Cover

I have been in desperate need of recovering my vanity bench cushion for the longest time but honestly...I've just been really lazy.  I think another reason is that I just could not find any fabric that I was all that excited about.  However - I did finally find this grey and white medallion fabric on fabric.com and that got my rear in gear! 
Here is the bench BEFORE.  It had a water stain on it and not only that it was just a sad, blah color.  It needed some glitz!


So to get started I had my hubs take the top off.
Next he took the black lining off by removing the staples.  I decided to leave the original suede cover on.  I just didn't think it was necessary to remove it.
Next I layed the lid on top of my fabric so I could decide where to cut it.
 Once I decided where I wanted to cut I just eye balled it and cut away.  I wasn't super technical with this part, I just made sure it was going to be long enough to come up over the cushion.
Once everything was cut and ready to go I started staple gunning the fabric to the back board of the cushion.  I started with one of the long sides first and then just worked my way around.  I really wanted to make sure that it's going to stay in place and stay tight so I did lots of staples. 
Next I did the short end and realized that to make the corner lay right I needed to trim so I did that as soon as I had staple gunned that side.
I checked out how the original corner was done and decided I would try to do mine that way as well.  It made the most sense to me and seemed the easiest.  There is probably a better way but that's OK.
Here is how my corners ended up looking...

Almost done!  As a final touch I decided to staple gun the black lining that we removed in the beginning, back on to make it look professional and like it was always there.  I also figured it would give it just a little bit more reinforcement.  Then I screwed the lid back on and bada bing bada boom.  It's done!
I love how it turned out!
Next I need to organize what I normally store in this little bench so once that's done I will show you what I came up with! 

Happy Monday!
 
Linking Up: